Preloaded Joint Analysis Methodology for Space Flight Systems
This page provides details on the analysis of bolted joints. This source of this page is Chambers, Jeffrey A., "Preloaded Joint Analysis Methodology for Space Flight Systems," NASA Technical Memorandum 106943, 1995.
Summary
This report is a compilation of some of the most basic equations governing simple preloaded joint systems and discusses the more common modes of failure associated with such hardware. It is intended to provide the mechanical designer with the tools necessary for designing a basic bolted joint. Although the information presented is intended to aid in the engineering of space flight structures, the fundamentals are equally applicable to other forms of mechanical design.
Introduction
Bolted joints are used in countless mechanical designs as the primary means of fastening. However common though, the behavior of bolted joints is quite complicated. For the typical bolted joint, various factors affect everything from the initial torquing and preloading to the final forces carried in the bolt. The parameters that must be considered to characterize joint behavior literally number in the hundreds making the proper selection, combination, and use of the variables quite confusing, especially to the occasional user. When it is also considered that the failure of a bolted joint will usually adversely affect the function or safety of the system, these factors take on even more importance. Given their role in the system's performance, the accurate characterization of bolted joints is of great interest. This is especially true when dealing with critical systems such as those encountered with space flight systems.
Nomenclature
| A | = | nominal fastener cross-sectional area, in.2 |
| Abr | = | bearing area, in.2 |
| As | = | fastener shear cross-sectional area, in.2 |
| At | = | fastener tensile cross-sectional area, in.2 |
| D | = | nominal fastener diameter (shank), in. |
| Dmajor,ext | = | major pitch diameter, external threads, in. |
| Dminor,min | = | minor pitch diameter, internal threads, in. |
| Dp | = | mean thread diameter, in. |
| dh | = | countersunk head diameter or head bearing diameter, in. |
| dt | = | through-hole diameter, in. |
| dw | = | effective countersunk head diameter, in. |
| Eb | = | bolt modulus of elasticity, psi |
| Ej | = | joint modulus of elasticity, psi |
| e | = | edge distance or eccentricity, in. |
| Fbr | = | material bearing (yield or ultimate) strength, psi |
| Fsu | = | material ultimate shear strength, psi |
| Fsy | = | material yield shear strength, psi |
| Ftu | = | material ultimate tensile strength, psi |
| Fty | = | material tensile yield strength, psi |
| K | = | typical nut factor |
| Kb | = | bolt stiffness, lb/in. |
| Kj | = | joint stiffness, lb/in. |
| L | = | fastener grip length, in. |
| Le | = | thread engagement length or nut thickness, in. |
| Li | = | insert thread engagement length, in. |
| LPi | = | ith loading plane |
| lh | = | countersunk head depth, in. |
| li | = | abutment component thickness, in. |
| M | = | applied bending moment, lb-in. |
| MS | = | margin of safety |
| n | = | loading plane factor |
| Pb | = | total axial bolt load, lb |
| ΔPb | = | change in axial bolt load, lb |
| Pbr | = | bearing load, lb |
| Pet | = | total externally applied axial load, lb |
| ΔPj | = | change in joint load, lb |
| Po | = | nominal bolt preload, lb |
| Po,final | = | final joint preload, lb |
| Po,initial | = | initial joint preload, lb |
| Po,max | = | maximum expected bolt preload, lb |
| Po,min | = | minimum expected bolt preload, lb |
| Prelax | = | axial bolt preload loss, lb |
| Psep | = | joint separation load, lb |
| Pth | = | axial bolt load due to thermal effects, lb |
| Pult | = | ultimate tensile load, lb |
| p | = | thread pitch, in. |
| Rb | = | bending load ratio |
| Rs | = | shear load ratio |
| Rt | = | tensile load ratio |
| SF | = | safety factor |
| SFsep | = | safety factor for separation |
| T | = | applied torque, in.-lb |
| ΔT | = | change in temperature, °F |
| t | = | thickness, in. |
| u | = | preload uncertainty factor |
| V | = | applied shear load, lb |
| α | = | thread angle, radians |
| αb | = | bolt coefficient of thermal expansion, in./in./°F |
| αj | = | abutment coefficient of thermal expansion, in./in./°F |
| δ | = | bolt deflection due to external load, in. |
| δb | = | bolt deflection, in. |
| δj | = | abutment deflection, in. |
| μ | = | coefficient of friction between threads |
| μc | = | coefficient of friction between bolt head (or nut) and abutment |
| ψ | = | thread helix angle, radians |
| ϕ | = | joint stiffness factor |
Need a Bolted Joint Calculator?
Try this bolted joint calculator.
- stress analysis of a bolted joint
- accounts for preload, applied axial load, and applied shear load
The Preloaded Joint
The Mechanics of Preloading
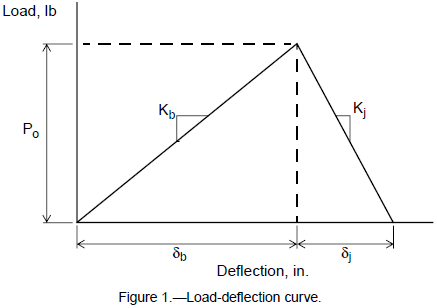
A bolted joint is most commonly preloaded, or prestressed, through the initial torquing of the joining elements. When an external torque is applied to the system, the bolt is elongated and the abutments (flanges) are compressed. The elongation of the bolt results in an initial tensile load, Po, in the bolt. Likewise, the compressed abutments deflect and carry a compressive load (Po) in the region surrounding the bolt. For most typical joint designs, the bolt and flange do not deflect at the same rate under preloading as a result of their different stiffnesses. The abutments are often much stiffer than the bolt resulting in less deflection than in the bolt (δj < δb). The preloading mechanism can be described graphically as shown in fig. 1.
Determining Bolt Preload
In general, a bolted joint performs best when it is preloaded such that the working loads are reacted primarily by the portion of the joint in compression. If designed properly, the bolt actually carries only a small portion (usually less than 20 percent) of that external loading while the greater portion of loading is offset by the release of the compressive energy introduced to the flanges during torquing. Essentially, a large portion of work is performed by the joint while a small portion of work is performed on the bolt. The joint is initially placed in compression by applying a tensile preload to the bolt. An initial preload is introduced so that the compression in the flanges is never completely relieved and hence the flange faces never separate. In order to obtain this level of preload, the bolt is usually prestressed very near its working limits (usually 65 to 90 percent of its yield strength). This preload is most commonly obtained by torquing of the elements and can be determined by (ref. 1)
The basic preload may vary from the intended value, either more or less, by an amount established by the preload uncertainty factor, u. Preload uncertainty is a function of many factors including torquing devices, lubrication, load measurement, etc. It accounts for parameters affecting the degree to which the applied torque actually results in joint preload. These parameters can be the sensitivity of the torque measuring device or inconsistencies in running friction from one bolt to another, among others. In general, it is safe to assume that the preload uncertainty for a hand-operated torque wrench used on a lubricated fastener is ±25 percent (ref. 1). For comparison, if load sensing (instrumented) bolts are used, the preload uncertainty factor may be reduced to ±5 percent.
The applied torque, T, and nominal diameter, D, are generally known and measurable parameters, but the nut factor, K, is not. The nut factor is essentially a factor applied to account for the effects of friction in the torquing elements (both in the threads and under the bolt head/nut). From Barrett (ref. 2), the typical nut factor, or torque coefficient, can be approximated as a function of thread geometry and element coefficients of friction and may be expressed as
Unfortunately, this method is quite complex since frictional coefficients between heavily loaded parts are not easily estimated with accuracy. A simpler approach is to assume that the nut factor usually ranges from 0.11 to 0.15 for lubricated fasteners. The lower end of this range provides the most conservative approach with respect to bolt loading since it produces the highest bolt preload. The upper end of the range provides the most conservative estimate for joint separation (to be discussed later) since it yields the lowest bolt preload. For unlubricated fasteners, a nut factor on the order of 0.2 may be used. When selecting a nut factor, the engineer may wish to examine both extremes of a reasonable range in order to assess the impacts on joint design.
As an alternative to the typical nut factor method of determining preload, the torque-preload relationships can be determined experimentally. Here, the torque-preload relationships are determined by direct measurements taken from instrumented joint specimens. Statistical data is recorded for the torque required to achieve a desired bolt force. Many relationships have been developed for various sizes, types, lubrications, and bolt materials commonly used in space flight hardware and are well documented in MSFC-STD-486B (ref. 3). For tensile loading applications, if the fastener is torqued in accordance with the guidelines, it may be assumed that the pretensioning develops 65 percent of the tensile yield strength of the bolt material. (Note 1)
The tensile area, At, is the minimum cross-sectional area of the bolt and is calculated from the following equation (ref. 1):
For NAS and MS standard fasteners of A-286 material with a yield strength of 85,000 psi, lubricated and torqued in accordance with reference 3, equation (3) may be expressed as
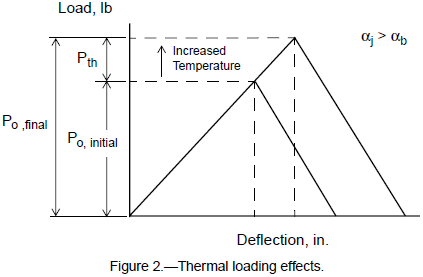
Torquing and preload uncertainty, however, are not the only parameters affecting the initial joint preload. Temperature changes and preload relaxation can modify initial preload. Thermal loading on the joint may be experienced if the bolt and flange materials have different coefficients of thermal expansion and the joint is subjected to a temperature change. Under a given temperature change (measured from the assembly state) the bolt and abutments expand or contract at differing rates which introduces a tension or relaxation in the bolt (Pth). Small changes in global operating conditions or large local temperature gradients can result in significant changes in joint loading and therefore must be considered.
To maintain contact within the joint, the thermal deflection of the bolt must be balanced by the total deflection in the flanges. For purposes of developing the relation, assume a connection with flanges made of aluminum and a bolt made of steel (αj > αb) is subjected to a uniform temperature increase. The flanges attempt to expand more than the bolt will allow which increases the load in the bolt. Therefore the total elongation of the bolt is the result of two components: the unrestricted thermal elongation plus an elongation due to the increased load in the joint. The total deflection in the flanges is the difference between the unrestricted thermal expansion and the additional compression due to the increase in preload. The change in preload can be derived as shown below.
Since the bolt and joint deflections are equal, δb = δj,
Rearranging yields the following basic thermal loading relation:
Figure 2 illustrates how a temperature change affects the initial joint load.
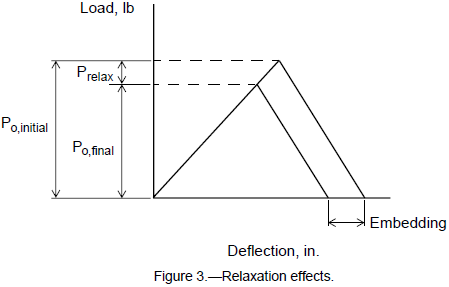
Preload relaxation (or embedding) occurs as the contact surfaces of the flanges and joining elements experience local yielding as they conform to one another over a period of time. Surface defects and machine marks that form high points on the contact surfaces experience local yielding under the preload. This eventually works to seat the surfaces together and relieves some portion of the preload as shown in fig. 2. There may also be some localized yielding in the threads of the bolt and nut that results in additional relaxation. Preload relaxation can also be encountered if elastomeric joint materials (e.g., gaskets) are used and experience permanent set over time. Dynamic or cyclic loading can lead to settling in the joint through fretting of the contact surfaces. The amount of preload relaxation can be quite difficult to characterize since it must consider the materials, loading, and physical (e.g., corrosive) environment in which the joint exists. The amount of embedding for typical metal-to-metal joints in a noncorrosive environment is typically between 2 and 10 percent (ref. 4). For design and analysis purposes it is safe to assume the preload loss to be about 5 percent, that is,
By including the effects of preload uncertainty, thermal effects, and preload relaxation, the maximum and minimum expected preloads in the joint may be described by (ref. 1)
and
Combining all factors for a manually torqued, lubricated fastener with negligible thermal effects, enables equations (12) and (13) to be expressed as
and
or
Equations (14) and (16) are used to determine the maximum and minimum expected preloads for various sizes of A-286 alloy and 300 Series CRES fasteners (see tables I and II).
| Diameter code | At, in.2 | T/KD, lb | Po,min, lb | Po,max, lb |
|---|---|---|---|---|
| #2 - 56 (0.086) | 0.00370 | 204 | 146 | 256 |
| #4 - 40 (0.112) | 0.00604 | 334 | 239 | 417 |
| #6 - 32 (0.138) | 0.00909 | 502 | 359 | 628 |
| #8 - 32 (0.164) | 0.0140 | 774 | 553 | 967 |
| #10 - 32 (0.190) | 0.0200 | 1105 | 789 | 1381 |
| 1/4 - 28 | 0.0364 | 2011 | 1436 | 2514 |
| 5/16 - 24 | 0.0580 | 3205 | 2289 | 4006 |
| 3/8 - 24 | 0.0878 | 4851 | 3465 | 6064 |
| 7/16 - 20 | 0.1187 | 6558 | 4684 | 8198 |
| 1/2 - 20 | 0.1599 | 8835 | 6311 | 11043 |
| 9/16 - 18 | 0.203 | 11216 | 8011 | 14020 |
| 5/8 - 18 | 0.256 | 14144 | 10103 | 17680 |
| 3/4 - 16 | 0.373 | 20608 | 14720 | 25760 |
| Note a: For A-286 alloy fasteners with minimum properties: Ftu = 130 ksi, Fty = 85 ksi, Fsu = 85 ksi. | ||||
| Diameter code | T/KD, lb | Po,min, lb | Po,max, lb |
|---|---|---|---|
| #2 - 56 (0.086) | 63 | 45 | 78 |
| #4 - 40 (0.112) | 102 | 73 | 128 |
| #6 - 32 (0.138) | 154 | 110 | 192 |
| #8 - 32 (0.164) | 237 | 169 | 296 |
| #10 - 32 (0.190) | 338 | 241 | 423 |
| 1/4 - 28 | 615 | 439 | 769 |
| 5/16 - 24 | 980 | 700 | 1225 |
| 3/8 - 24 | 1484 | 1060 | 1855 |
| 7/16 - 20 | 2006 | 1433 | 2508 |
| 1/2 - 20 | 2702 | 1930 | 3378 |
| 9/16 - 18 | 3431 | 2451 | 4288 |
| 5/8 - 18 | 4326 | 3090 | 5408 |
| 3/4 - 16 | 6304 | 4503 | 7880 |
| Note a: For 300 series CRES fasteners with minimum properties: Ftu = 73 ksi, Fty = 26 ksi, Fsu = 50 ksi. | |||
Fastener Axial Load
The total axial load in a fastener consists of the preload plus that portion of the external mechanical load not reacted by the joint. The total axial bolt load, Pb, can be given by (ref. 1)
where Pet is the resultant external force directed at the joint. This can be obtained through a free-body diagram of the system, finite element results, or other means. This external force must however include all components (e.g., prying action, moment resistance, etc.) that may increase or decrease the final force acting at the bolt. A factor of safety (SF) is applied to the external loading only (as opposed to Pb as a whole) since inaccuracies of the preloading process have already been accounted for in the development of Po. The factors of safety for general space flight hardware are usually dependent on the method of verification used (ref. 5) and may differ from program to program. For nonpressurized, untested applications the safety factors are normally 1.25 and 2.0 for yield and ultimate strengths, respectively, while 1.1 and 1.4 are typical for nonpressurized, tested applications. Safety factors are strongly dependent on the specific application, method of loading, and overall design requirements, and therefore should be reviewed carefully before using them with the joint equations.
The terms n and ϕ represent the effectiveness of the joint in reducing the amount of external loading transferred to the bolt. Both parameters can be examined by considering the joint as a system of springs as shown in figure 4.
Under the initial preloading the bolt carries a tensile load while the flanges carry an equal compressive load. If an external tensile load, Pet, is introduced very near the contact surface between the two flanges (n ≊ 0), then both flanges are further compressed through almost their entire depth. Only a very small portion of the flanges between the induction points is left to undergo relaxation of its compressive preload. In the spring diagram, springs a and d are very long in comparison to springs b and c. As the external load is applied, springs b and c are relieved (unloaded) of some of their compression while springs a and d are further compressed (loaded). The compressive deflection relieved in springs b and c is partly offset by the additional compressive deflection gained in springs a and d. Any additional elongation (and hence loading) in the bolt is equal to the difference in deflections between the unloaded and loaded sections of the flanges. This action with the flanges reacts a large portion of the external loading as shown in fig. 5(a). When the magnitude of Pet reaches that of the initial preload, Po, all remaining compression in springs b and c has been relieved and the flange faces separate. Once the flanges have separated, the bolt is left to carry the entire external load.
If the external loading is applied at the free faces of the flanges (n = 1.0), the entire thickness of the flanges are relieved of their compression as loading is applied. All springs a, b, c, and d are relaxed. Since there is no flange material beyond the loading planes to undergo additional compression (such as in the previous case), the bolt elongates at the same rate that the flanges are relieved. In this situation the joint follows the load-deflection curve as shown in fig. 5(b). Again, separation of the flanges is not encountered until all compression in the flanges has been relieved. For equal loading applied in both cases, the latter case (n = 1.0) results in greater load being transferred to the bolt.
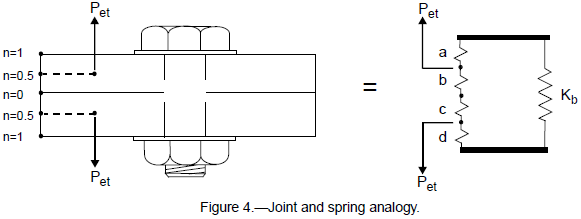
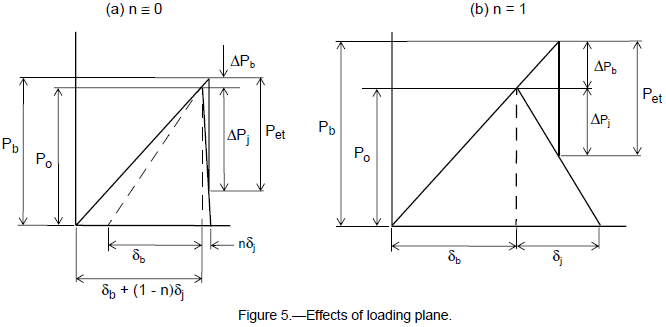
In most practical joint applications the behavior of the joint is at some point between these two extremes. For common joint designs the load is carried somewhere near the midplanes of the flanges as shown in fig. 6. With loading introduced near these midplanes (n = 0.5), the flange regions inboard and outboard of the loading planes work together much like the case of n ≊ 0 but to a lesser degree. The loading plane factor is described by reference 1 as
For most joints, it is usually acceptable to assume the loading planes to be located at the midplanes of the flanges or the midplanes outermost members if more than two components are being bolted. The joint configuration should always be examined closely to insure that this assumption is applicable.
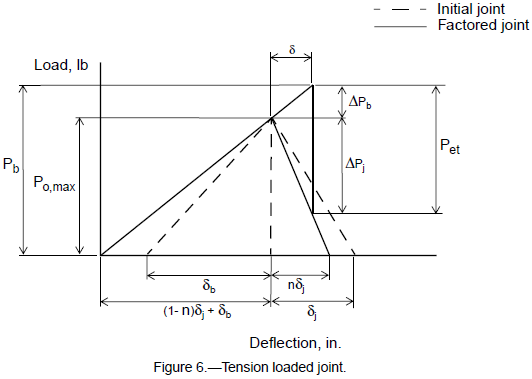
The stiffness factor, ϕ, determines the proportion in which the load is shared between bolt and joint. Since the extensional deflection, δ, of the bolt under an arbitrary tensile loading, Pet, is equal to the amount of net deflection in the flanges, the force in each component can be determined with the aid of the load-deflection diagram (fig. 6).
Rearranging equation (20) and using the result to rewrite equation (19) in terms of ΔPb give
So the stiffness factor (or load factor) is defined as
Then equation (28) can be written as
The bolt stiffness, Kb, is equal to the axial stiffness of a circular rod with a cross section based on the nominal bolt diameter. The joint stiffness, Kj, is taken as the stiffness of the flange region which experiences the compressive preload. It can be very difficult to determine the exact region of the flange which is placed in compression and equally difficult to determine its stiffness. Several methods exist that estimate (either mathematically or experimentally) the stiffness of this load affected region; however, the method outlined by Shigley (ref. 6) has been used in this report. This method assumes that compressive loading in the flange(s) is distributed through 45° conical sections like those shown in fig. 6. Relations for the various joint parameters are given for several typical joint configurations shown in figures 7 to 10.
Configuration 1
Multiple parts are bolted together with a through-bolt and washer/nut combination. The bolt may be hex, socket, or pan head style (see fig. 7).
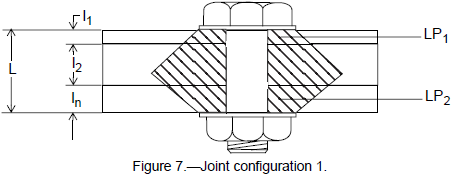
For configuration 1, the following equations apply:
Configuration 2
Parts are bolted together with a flat-head through-bolt and washer/nut combination (see fig. 8).
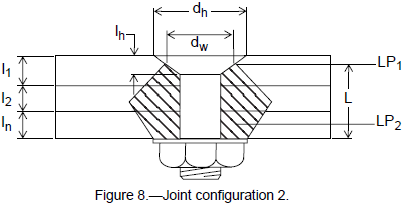
For configuration 2, the following equations apply:
Note that, if dw ≈ 1.5D, which is the case for typical aerospace fasteners, then equation (38) reduces to equation (33).
Configuration 3
Parts are bolted together with a bolt threaded into the last part (with or without insert). The bolt may be hex, socket, or pan head style (see fig. 9).
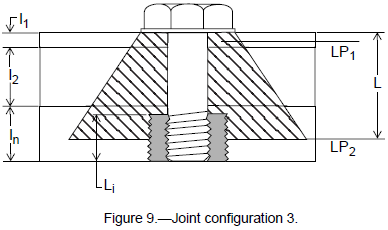
For configuration 3, the following equations apply:
Configuration 4
Parts are bolted together using a flat-head bolt threaded into the last assembled part (see fig. 10):
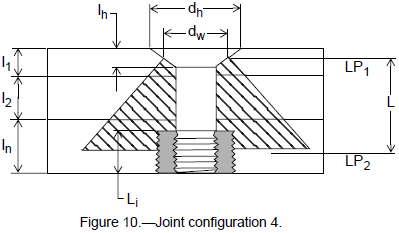
For configuration 4, the following equations apply:
Note again that, if dw ≈ 1.5D, then equation (49) reduces to equation (44).
Need a Bolted Joint Calculator?
Try this bolted joint calculator.
- stress analysis of a bolted joint
- accounts for preload, applied axial load, and applied shear load
Fastener Strength Criteria
In general, for preloaded joints to work effectively they must meet (at a minimum) the following criteria (ref. 1):
- Bolt(s) and joint must have adequate strength.
- Joint must not experience separation under loading.
- Bolt(s) must have adequate fracture and fatigue life.
Only the first two requirements will be discussed in this report. The third requirement addresses joints subject to dynamic or cyclic loading and is a matter that needs to be addressed separately. In most applications the bolted connections in space flight hardware are considered to be statically loaded. The dynamic load components present during the launch, orbit, and landing phases are usually short in duration and therefore replaced by equivalent static loads that would be developed by the dynamic events (ref. 5).
The first requirement is explicitly defined by the payload safety verification requirements associated with space flight hardware which mandates that all safety and fracture critical fasteners possess positive (>0.0) margins of safety for all modes of failure. These margins of safety (MS) for bolts under various states of loading can be expressed (but are not limited to) as follows:
Tension Only Criteria
For bolts subjected to pure tensile loading, the following is applicable:
In general, for most modes of failure a margin of safety can be calculated for both ultimate and yield strengths. Both of these margins should be checked to determine which is limiting (critical) since a positive margin may exist for one while a negative margin exists for the other.
Shear Only Criteria (Note 2)
For bolts subjected to pure shear loading, the following is applicable:
The externally applied shear load, V, is again found by resolving all external shear loads into a resultant load acting at the individual fastener. The shear load usually has components determined from translational forces as well as components resulting from resisting moments in the joint. The allowable shear load can be given by
A similar relation exists for the allowable yield load in shear.
The shear area, As, is normally equal to the minimum tensile area, for example, As = At, unless the joint is designed such that the shear plane acts on the unthreaded shank of the fastener. If the shear plane acts solely through the unthreaded portion of the bolt, the shear area may be based on the nominal diameter.
The bolt material ultimate shear strength, Fsu, can usually be found for most ductile materials in references such as MIL-HDBK-5F or ASTM material specifications. The shear yield strength, Fsy, may be assumed to be 0.577Fty.
Combined Tension and Shear
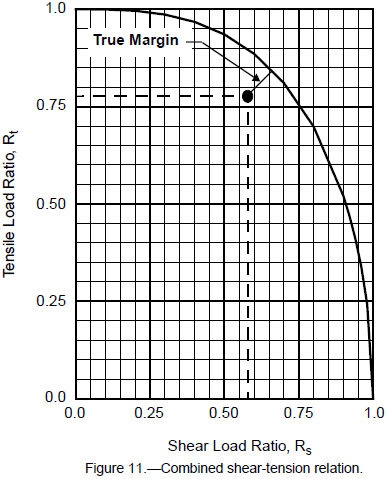
For bolts subjected to the combination of simultaneous tension and shear, the following interaction equation must be satisfied (ref. 7):
where the axial and shear load ratios are
If equation (56) is viewed graphically, a curve is defined in the Rt-Rs space such as that shown in figure 11. Any combination of Rt and Rs beneath this curve satisfies the criteria and the bolt possesses some margin against failure. The margin of safety is represented by the shortest distance from the Rt-Rs point to the curve established by equation (56). This distance can be quite difficult to determine however, so an alternate method for estimating a relative numerical margin of safety given by equation (59) may be used.
Combined Tension, Shear, and Bending
Although it is good design practice to avoid putting bolts into direct bending, occasions do arise where bending is experienced. Bolt bending may result from double shear, misalignment during assembly, use of long spacers, or from flanges that are several orders of magnitude stiffer than the bolt. In the latter case the flange tends to rotate as a rigid body, forcing the head of the bolt to rotate which applies moment loading to the bolt. For bolts subjected to the combination of tension, shear, and bending loads acting simultaneously, the following relation must hold (ref. 1):
where the ratio for the bending allowable is given by equation (61).
The bending allowable is usually based on the modulus of rupture (ref. 7) of the bolt material. The margin of safety relation is (Note 3)
Margins of safety should be calculated for both yield and tensile strengths to determine the limiting case.
Bolt Thread Shear
The thread shear area of the bolt is the cylindrical area formed by the minor diameter of the mating internal threads and the length of thread engagement (ref. 8). This shear area can be estimated from the following relation:
where Le is the engaged length of bolt thread. Usually, only the ultimate thread strength under axial loading is checked with the ultimate load being given as
The margin of safety is
Need a Bolted Joint Calculator?
Try this bolted joint calculator.
- stress analysis of a bolted joint
- accounts for preload, applied axial load, and applied shear load
Joint Separation Criteria
Separation of a joint occurs when the external tensile load relieves all of the initial compressive preload applied to the joint. Once the joint separates, the flanges cannot contribute to the load carrying capability of the connection, and the bolt is left to carry all of the external loading. In addition to increasing the total bolt load, this condition also severely hampers the fatigue resistance of the joint under cyclic loading. In fluid or pressure applications joint separation may also lead to leaking. For these reasons and others, separation is an unwanted condition for the joint. Therefore the design criteria states that separation of a preloaded joint must not occur. Figure 12 illustrates this separation condition in terms of the load-deflection diagram.
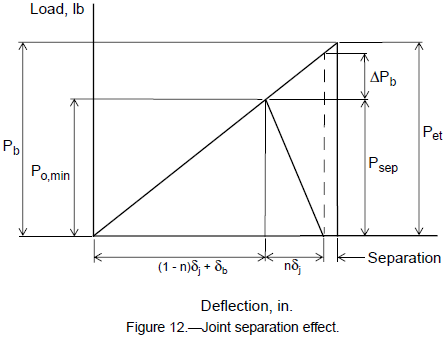
At any load Pet resulting in Psep < Po,min, the system possesses compressive energy and behaves as discussed earlier. When the portion of loading carried by the joint equals the preload (represented by the dashed line), ΔPj = Psep = Po,min, the compressive force held in the joint is totally exhausted and the joint begins to separate. Loading the joint beyond the separation point results in all of the loading being transferred through the bolt.
Referring back to equation (30) reveals that the portion of loading carried by the bolt at this point of separation is
Therefore the separation load is defined by
The margin of safety for joint separation can then be given as
The recommended factor of safety for joint separation, SFsep, is equal to 1.2 for structural applications and 1.4 for pressure system applications.
Other Modes of Failure
Depending on the joint application, there are other modes of failure that may need to be addressed. These may include shear tear out of the lug material, bearing of the bolt against the lug, and bearing of the bolt head and/or nut against the lug.
Shear Tear Out
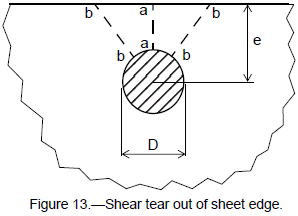
Shear tear out is possible when the bolt is positioned near the free edge of one or more of the abutment components and is loaded in shear. The bolt fails the abutment by shearing (or tearing) the material between the hole and the free edge of the abutment. This type of failure is common with lug type fittings and thin sheet abutments. The ultimate shear out load is
The available shear area (ref. 7) is
where t is the thickness of the sheet or lug, e is the perpendicular distance from the hole centerline to the free edge of the sheet, and D is the nominal fastener diameter (as shown in fig. 13). A factor of two is used in the calculation of the shear area since the tear out occurs along two planes; one on each side of the bolt. This area is quite conservative since it considers the shear planes acting along the shortest distance between the edge of the hole and edge of the sheet (across section a-a). More realistically, this shearing action would occur at planes (sections b-b) located at some angle relative to the centerline (ref. 7).
The associated margin of safety is then
The possibility of encountering shear tearout can be greatly reduced if design practices are employed which maintain minimum e/D ratios of 2.0 or more. Occasionally the hardware design does not permit maintaining the 2.0 factor and the ratio must be reduced. In this situation, the e/D ratio may be reduced to as low as 1.5, however, it is never advisable to permit edge conditions resulting in an e/D ratio of less than 1.5 (ref. 9). As the ratio falls below 1.5, shear tearout failure becomes less prominent as the dominating stresses are tensile in nature. The failure mode then becomes a tensile (hoop stress) failure across the minimum section between the bolt and edge of the abutment.
Bolt Bearing
If the bolt is loaded in shear, bearing failure may occur as the bolt is pressed against the side of the throughhole or bushing. This loads the surrounding material with high bearing stresses that can locally fail the sheet or lug material. The limiting bearing load is given as
where the bearing area, Abr, is
and
These equations should be checked for both yield and ultimate conditions.
A more rigorous method of determining both the shear tear out and bearing failures is developed in Bruhn (ref. 7) and NASA TM X-73305 (ref. 10). This is the recommended method if the preceding equations indicate marginal results (e.g., MS < 0.5) or if the e/D ratio is below 1.5.
Bearing Under the Bolt Head
Bearing under the head of the bolt (or nut) may need to be examined in situations of high preload, large external loads, or soft abutment materials. The limiting bearing load is the same as that of equation (72) except the bearing area is replaced by the effective projected area over which the load acts. This bearing area is given by
where dh is the minimum contact diameter of the bolt head (or washer) and dt is the maximum diameter of the lug through-hole. The margins of safety are again calculated for both yield and ultimate using equation (74).
Need a Bolted Joint Calculator?
Try this bolted joint calculator.
- stress analysis of a bolted joint
- accounts for preload, applied axial load, and applied shear load
Threaded Insert Analysis
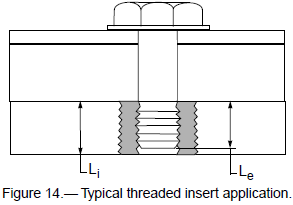
For joints using threaded inserts, such as the joint shown in fig. 14, three basic modes of failures may be encountered. The first mode of failure, shear failure of the insert's internal threads, is exhibited as the fastener pulls out of the insert, failing the internal threads of the insert. The second failure mode, shear failure of the insert's external threads, is exhibited as the insert pulls from the parent material, failing the external threads of the insert. The third mode of failure, shear failure of the parent material's internal threads, results as the fastener and insert together pull from the parent material, failing the internal threads of the parent material. Each failure mode may be investigated using the methods described in the following sections.
Insert Internal Thread Failure
The ultimate strength of the insert in the internal thread shear failure mode is dependent on the amount of shear area available to resist axial loading of the bolt. This thread shear area is a function of the thread size and type as well as the length of thread engagement. In much the same manner as the external thread shear strength of the bolt, the insert internal thread shear strength is based on the major diameter of the mating external threads. This thread shear area can be estimated by (ref. 8).
The insert ultimate allowable pull-out strength is then
The allowable pull-out strengths for several standard sizes of inserts are summarized in table III.
| Threaded Insert | Pult, lb | ||||
|---|---|---|---|---|---|
| Specification | Size code [a] | Internal thread | Li, in. | A-286 Alloy | 300 Series CRES |
| MS51830E | 101L | #2 - 56 | 0.105 | 2110 | 1241 |
| 102L | #4 - 40 | 0.155 | 4056 | 2386 | |
| 103L | #6 - 32 | 0.155 | 4988 | 2940 | |
| 104L | #8 - 32 | 0.205 | 7856 | 4621 | |
| 201L | #10 - 32 | 0.297 | 13185 | 7756 | |
| 202L | 1/4 - 28 | 0.360 | 21029 | 12370 | |
| 203L | 5/16 - 24 | 0.422 | 30813 | 18126 | |
| 204L | 3/8 - 24 | 0.485 | 42496 | 24998 | |
| 205L | 7/16 - 20 | 0.547 | 55917 | 32892 | |
| 206L | 1/2 - 20 | 0.610 | 71265 | 41921 | |
| MS51831F | 207L | 9/16 - 18 | 0.797 | 104751 | 61618 |
| 208L | 5/8 - 18 | 0.860 | 125590 | 73877 | |
| 209L | 3/4 - 16 | 1.235 | 216424 | 127308 | |
| Note a: Internal locking thread, externally key locked. Other sizes, lengths, and thread pitches are available, including Extra Heavy Duty (MS51832C) inserts. The allowables for these inserts may be calculated in the same manner. | |||||
Insert External Thread Failure
The shear area of the insert's externally threaded region is calculated in the same manner as that for the external thread shear area of the bolts given by equation (63) with the exception that the area must be reduced by the amount of area lost for the insert locking keys (if applicable). With external thread shear area, the insert pull-out strength is
Allowable external thread strengths for some standard size inserts are given in table IV.
| Threaded Insert | Pult, lb | ||||
|---|---|---|---|---|---|
| Specification | Size code [a] | Internal thread | As [b], in.2 | A-286 Alloy | 300 Series CRES |
| MS51830E | 101L | #2 - 56 | 0.0157 | 1335 | 785 |
| 102L | #4 - 40 | 0.0302 | 2567 | 1510 | |
| 103L | #6 - 32 | 0.0329 | 2797 | 1645 | |
| 104L | #8 - 32 | 0.0669 | 5687 | 3345 | |
| 201L | #10 - 32 | 0.0945 | 8033 | 4725 | |
| 202L | 1/4 - 28 | 0.1726 | 14671 | 8630 | |
| 203L | 5/16 - 24 | 0.2321 | 19729 | 11605 | |
| 204L | 3/8 - 24 | 0.3366 | 28611 | 16830 | |
| 205L | 7/16 - 20 | 0.4606 | 39151 | 23030 | |
| 206L | 1/2 - 20 | 0.5831 | 49564 | 29155 | |
| MS51831F | 207L | 9/16 - 18 | 1.0247 | 87100 | 51235 |
| 208L | 5/8 - 18 | 1.2415 | 105528 | 62075 | |
| 209L | 3/4 - 16 | 2.4478 | 208063 | 122390 | |
| Note a: Internal locking thread, externally key locked. Other sizes, lengths, and thread pitches are available, including Extra Heavy Duty (MS51832C) inserts. The allowables for these inserts may be calculated in the same manner. | |||||
| Note b: Minimum shear engagement areas taken from MIL-I-45914A, "Insert, Screw Thread - Locked In, Key Locked, General Specification For", April 1991. | |||||
Insert Parent Material Thread Failure
Although the actual thread shear area of the parent material is increased slightly over that of the insert's external thread shear area, for conservative purposes the shear area of the parent material internal thread is assumed to be the same as the insert's reduced external thread shear area used for equation (78). The parent material pull-out strength is then
The allowable pull-out strengths have been tabulated in table V for 6061-T6 aluminum alloy parent material. Similar values can easily be calculated for other parent materials.
| Threaded Insert | Parent Material: 6061-T6 aluminum alloy [a] | ||
|---|---|---|---|
| Specification | Size code [b] | Internal thread | Pult, lb |
| MS51830E | 101L | #2 - 56 | 424 |
| 102L | #4 - 40 | 815 | |
| 103L | #6 - 32 | 888 | |
| 104L | #8 - 32 | 1806 | |
| 201L | #10 - 32 | 2552 | |
| 202L | 1/4 - 28 | 4660 | |
| 203L | 5/16 - 24 | 6267 | |
| 204L | 3/8 - 24 | 9088 | |
| 205L | 7/16 - 20 | 12436 | |
| 206L | 1/2 - 20 | 15744 | |
| MS51831F | 207L | 9/16 - 18 | 27667 |
| 208L | 5/8 - 18 | 33521 | |
| 209L | 3/4 - 16 | 66091 | |
| Note a: Aluminum properties taken from MIL-HDBK-5F, Table 3.6.2.0(b1). | |||
| Note b: Internal locking thread, externally key locked. Other sizes, lengths, and thread pitches are available, including Extra Heavy Duty (MS51832C) inserts. The allowables for these inserts may be calculated in the same manner. | |||
Margin of Safety Criteria
For all three modes of failure, the margin of safety is given as
The margin of safety should be calculated for all three modes of failure, for ultimate strength only, to determine the limiting mode of failure.
Need a Bolted Joint Calculator?
Try this bolted joint calculator.
- stress analysis of a bolted joint
- accounts for preload, applied axial load, and applied shear load
Nut Strength
Standard MS Class II nuts (including fixed and floating plate nuts) are designed to develop the full tensile strength of a bolt having an ultimate tensile strength of 125 ksi when the tensile area (At) is based on the basic pitch diameter of the bolt. As such, the nut strength may be expressed as
The ultimate strengths for the Class II nuts (ref. 11) have been tabulated and are listed in table VI.
| Diameter code | Pult, lb |
|---|---|
| #2 - 56 | 440 |
| #4 - 40 | 750 |
| #6 - 32 | 1130 |
| #8 - 32 | 1720 |
| #10 - 32 | 2460 |
| 1/4 - 28 | 4580 |
| 5/16 - 24 | 7390 |
| 3/8 - 24 | 11450 |
| 7/16 - 20 | 15450 |
| 1/2 - 20 | 21110 |
| 9/16 - 18 | 26810 |
| 5/8 - 18 | 34130 |
| 3/4 - 16 | 50020 |
The margin of safety for the nut may be calculated using equation (80).
Torque Limits
Tables VII, VIII, and IX were derived from MSFC-STD-486B (ref. 3) for tensile applications. The torque values given in MSFC-STD-486B have been reduced in proportion to the relative material strengths given in MIL-HDBK- 5F.
| Nominal [c] size, in. | Nut cadmium plated per QQ-P-416 [d], in.-lb | Lubricated with dry film lubricant [e], in.-lb | Lubricated with calcium grease [f], in.-lb |
|---|---|---|---|
| #10 (0.190) | 21 - 23 | 19 - 22 | 17 - 18 |
| 1/4 | 53 - 58 | 48 - 54 | 39 - 43 |
| 5/16 | 119 - 132 | 106 - 117 | 77 - 85 |
| 3/8 | 240 - 266 | 208 - 299 | 154 - 171 |
| 7/16 | 399 - 441 | 364 - 402 | 249 - 275 |
| 1/2 | 644 - 712 | 591 - 653 | 386 - 426 |
| 9/16 | 922 - 1019 | 877 - 970 | 538 - 595 |
| 5/8 | 1297 - 1433 | 1233 - 1362 | 734 - 812 |
| 3/4 | 2276 - 2516 | 2232 - 2467 | 1233 - 1362 |
| Note a: Assumes 130 ksi ultimate tensile strength. | |||
| Note b: Add locking torque of self-locking devices to torques values specified in the table. Assumes use of countersunk washers under the bolt heads and plain washers under nuts. | |||
| Note c: Bolts are furnished with bare/passivated finish. | |||
| Note d: Nuts are plated per QQ-P-416, Type II, Class 3 and Use Is Limited to 446 °F. | |||
| Note e: Bolts and nuts shall be fully coated with MIL-L-8937 lubricant and Use Is Limited to 446 °F. Lubricant shall be listed on QPL 8937. | |||
| Note f: Nuts are plated per QQ-P-416, Type II, Class 3 and CONOCO HD Calcium Grease No. 2 (or equivalent) shall be applied to the structure and bolt threads, shank, and washer of the fastener system. Use Is Limited to 446 °F. | |||
| Nominal size, in. | Passivated, in.-lb | Plated, in.-lb | Lubricated, in.-lb |
|---|---|---|---|
| #10 (0.190) | 29 - 31 | 23 - 24 | 17 - 18 |
| 1/4 | 61 - 64 | 48 - 51 | 36 - 38 |
| 5/16 | 113 - 119 | 90 - 95 | 67 - 71 |
| 3/8 | 195 - 205 | 156 - 164 | 117 - 123 |
| 7/16 | 325 - 342 | 260 - 274 | 195 - 205 |
| 1/2 | 433 - 456 | 347 - 365 | 260 - 274 |
| 9/16 | 607 - 639 | 485 - 511 | 364 - 383 |
| 5/8 | 867 - 913 | 694 - 730 | 521 - 548 |
| 3/4 | 1248 - 1314 | 997 - 1049 | 746 - 785 |
| Note a: 300 Series CRES bolts have 73 ksi minimum ultimate tensile strength. | |||
| Note b: Add locking torque of self-locking devices to torque values specified in the table. Assumes use of countersunk washers under bolt heads and plain washers under nuts. | |||
| Nominal size, in. |
Material | ||
|---|---|---|---|
| 300 Series CRES, in.-oz |
A-286 Alloy, in.-oz |
||
| #2 - 56 (0.086) | 26 - 28 | 47 - 52 | |
| #4 - 40 (0.112) | 55 - 60 | 100 - 110 | |
| #6 - 32 (0.138) | 102 - 112 | 185 - 204 | |
| #8 - 32 (0.164) | 181 - 200 | 340 - 375 | |
| Note a: When lubricants are used, tighten to the minimum torque value in the table. | |||
| Note b: When self-locking devices are used, tighten to the maximum torque value in the table unless running torques are directly measured. | |||
These torque tables should be followed in conjunction with the procedures and restrictions set forth in MSFCSTD- 486B. If a particular fastener arrangement or application (e.g., shear) is encountered, but not listed here, the parent document should again be sought for the appropriate torque levels.
Footnotes
Note 1: Establishing an initial preload of 65 precent of yield is specific to some NASA space flight hardware. Other applications may require more or less initial preload depending on functional requirements. However, when a preload target level is established, additional stresses (e.g., torsional stresses) must be considered that may be additive to the axial preload stress.
Note 2: The equations presented here are for joint systems where the applied shear loads are minimal in comparison to the axially applied loads (preload included). Joints designed principally for shear require special considerations, and hence the reader is cautioned to use extreme care when designing such a joint.
Note 3: The reader is cautioned that equations (59) and (62) can be unconservative in certain situations. The proper interaction equations should always be checked for critical applications.
References
- Criteria for Preloaded Bolts. NSTS–08307, 1989.
- Barrett, R.T.: Fastener Design Manual. NASA RP–1228, 1990.
- Wood, C.M.: Standard Threaded Fasteners, Torque Limits For. MSFC–STD–486B, Nov. 1992.
- Shigley, J.E.; and Mischke, C.R.: Fastening, Joining, and Connecting, A Mechanical Designers' Workbook. McGraw-Hill Publishing Co., New York, 1990.
- Payload Flight Equipment Requirements for Safety-Critical Structures. JA–418, Rev. A, 1989.
- Shigley, J.E.; and Mitchell, L.D.: Mechanical Engineering Design, Fourth Ed., McGraw-Hill Publishing Co., New York, 1983.
- Bruhn, E.F.: Analysis and Design of Flight Vehicle Structures. Jacobs Publishing, Co., Carmel, Indiana, 1973.
- Federal Standard: Screw-Thread Standards For Federal Service. FED–STD–H28, 1978.
- Metallic Materials and Elements for Aerospace Vehicle Structures. MIL–HDBK–5F, 1990.
- Astronautic Structures Manual. NASA TM X–73305, vol. I, 1975.
- Nut, Self Locking, 250 °F, 450 °F, and 800 °F. MIL–N–25027F, 1994.
