Fastener Torque
This page provides the sections on proper bolt torque from Barrett, "Fastener Design Manual," NASA Reference Publication 1228, 1990.
Other related chapters from the NASA "Fastener Design Manual" can be seen to the right.
Fastener Torque
Determining the proper torque for a fastener is the biggest problem in fastener installation. Some of the many variables causing problems are
- The coefficient of friction between mating threads
- The coefficient of friction between the bolthead (or nut) and its mating surface
- The effect of bolt coatings and lubricants on the friction coefficients
- The percentage of bolt tensile strength to be used for preload
- Once agreement is reached on item 4, how to accurately determine this value
- Relative spring rates of the structure and the bolts
- Interaction formulas to be used for combining simultaneous shear and tension loads on a bolt (Should friction loads due to bolt clamping action be included in the interaction calculations?)
- Whether "running torque" for a locking device should be added to the normal torque
Development of Torque Tables
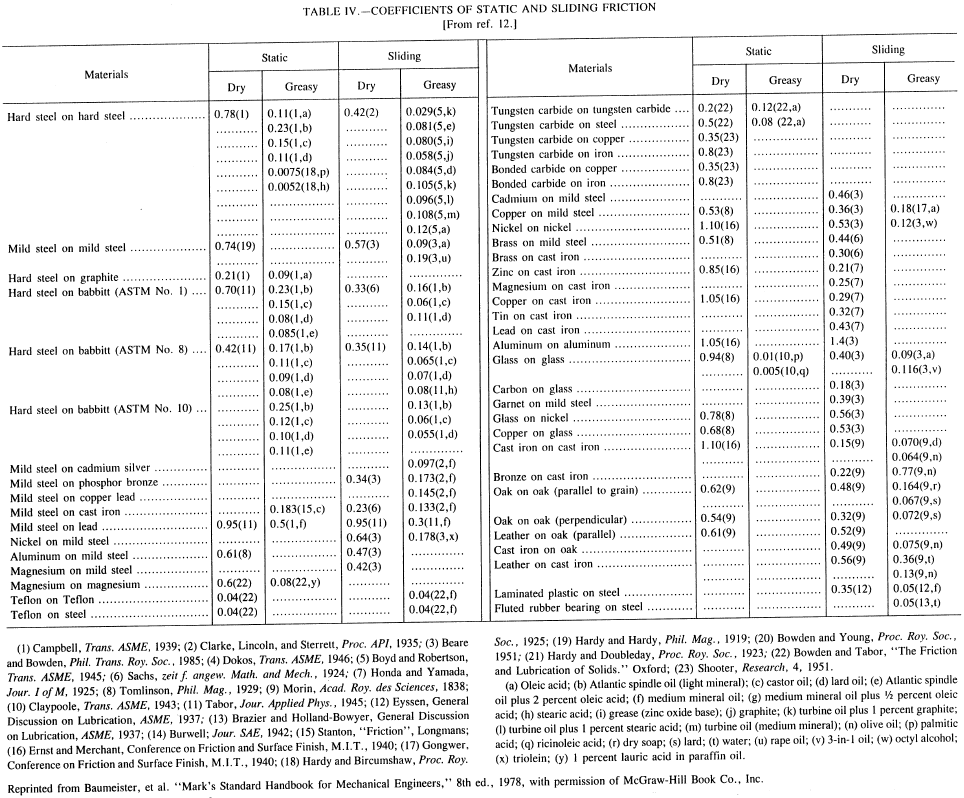
The coefficient of friction can vary from 0.04 to 1.10, depending on the materials and the lubricants being used between mating materials. (Table IV from ref. 2 gives a variety of friction coefficients.) Since calculated torque values are a function of the friction coefficients between mating threads and between the bolthead or nut and its mating surface, it is vitally important that the torque table values used are adjusted to reflect any differences in friction coefficients between those used to calculate the table and the user's values. Running torque should be included in the values listed in the tables because any torque puts shear load on the bolt.
The torque values in table V have been calculated as noted in the footnotes, by using formulas from reference 3. (A similar table was published in Product Engineering by Arthur Korn around 1944.)
Higher torques (up to theoretical yield) are sometimes used for bolts that cannot be locked to resist vibration. The higher load will increase the vibration resistance of the bolt, but the bolt will yield and unload if its yield point is inadvertently exceeded. Since the exact yield torque cannot be determined without extensive instrumentation, it is not advisable to torque close to the bolt yield point.
Fastener proof load is sometimes listed in the literature. This value is usually 75 percent of theoretical yield, to prevent inadvertent yielding of the fastener through torque measurement inaccuracies.

| Size | Root area, in.2 |
Torque range (class 8, 150 ksi, bolts (Note 1)) |
|---|---|---|
| 10-24 | 0.0145 | 23 to 34 in.-lb |
| 10-32 | 0.0175 | 29 to 43 in.-lb |
| 1/4-20 | 0.0269 | 54 to 81 in.-lb |
| 1/4-28 | 0.0326 | 68 to 102 in.-lb |
| 5/16-18 | 0.0454 | 117 to 176 in.-lb |
| 5/16-24 | 0.0524 | 139 to 208 in.-lb |
| 3/8-16 | 0.0678 | 205 to 308 in.-lb |
| 3/8-24 | 0.0809 | 230 to 345 in. -lb |
| 7/16-14 | 0.0903 | 28 to 42 ft -lb |
| 7/16-20 | 0.1090 | 33 to 50 ft-lb |
| 1/2-13 | 0.1257 | 42 to 64 ft-lb |
| 1/2-20 | 0.1486 | 52 to 77 ft-lb |
| 9/16-12 | 0.1620 | 61 to 91 ft-lb |
| 9/16-18 | 0.1888 | 73 to 109 ft-lb |
| 5/8-11 | 0.2018 | 84 to 126 ft-lb |
| 5/8-18 | 0.2400 | 104 to 156 ft-lb |
| 3/4-10 | 0.3020 | 117 to 176 ft-lb (Note 2) |
| 3/4-16 | 0.3513 | 139 to 208 ft-lb (Note 2) |
| 7/8-9 | 0.4193 | 184 to 276 ft-lb (Note 2) |
| 7/8-14 | 0.4805 | 213 to 320 ft-lb (Note 2) |
| 1-8 | 0.5510 | 276 to 414 ft-lb (Note 2) |
| 1-14 | 0.6464 | 323 to 485 ft-lb (Note 2) |
| 1 1/8-7 | 0.6931 | 390 to 585 ft-lb (Note 2) |
| 1 1/8-12 | 0.8118 | 465 to 698 ft-lb (Note 2) |
| 1 1/4-7 | 0.8898 | 559 to 838 ft-lb (Note 2) |
| 1 1/4-12 | 1.0238 | 655 to 982 ft-lb (Note 2) |
| Note 1: The values given are 50 and 75 percent of theoretical yield strength of a bolt material with a yield of 120 ksi. Corresponding values for materials with different yield strengths can be obtained by multiplying these table values by the ratio of the respective material yield strengths. | ||
| Note 2: Bolts of 0.75-in. diameter and larger have reduced allowables (75 percent of normal strength) owing to inability to heat treat this large a cross section to an even hardness. | ||
Need a Bolted Joint Calculator?
Try this bolted joint calculator.
- stress analysis of a bolted joint
- accounts for preload, applied axial load, and applied shear load
Alternative Torque Formula
A popular formula for quick bolt torque calculations is T = KFd, where T denotes torque, F denotes axial load, d denotes bolt diameter, and K (torque coefficient) is a calculated value from the formula:
$$ K = \left({ d_m \over 2d }\right) { \tan{\psi} + \mu \sec{\alpha} \over 1 - \mu \tan{\psi} \sec{\alpha} } + 0.625 \mu_c $$as given in reference 4 (p. 378) where
| dm | thread mean diameter |
| ψ | thread helix angle |
| μ | friction coefficient between threads |
| α | thread angle |
| μc | friction coefficient between bolthead (or nut) and clamping surface |
The commonly assumed value for K is 0.2, but this value should not be used blindly. Table VI gives some calculated values of K for various friction coefficients. A more realistic "typical" value for K would be 0.15 for steel on steel. Note that μ and μc are not necessarily equal, although equal values were used for the calculated values in table VI.
| Friction coefficient | Torque Coefficient, K |
|
|---|---|---|
| Between threads, μ |
Between bolthead (or nut) and clamping surface, μc |
|
| 0.05 | 0.05 | 0.074 |
| 0.10 | 0.10 | 0.133 |
| 0.15 | 0.15 | 0.189 |
| 0.20 | 0.20 | 0.250 |
Torque-Measuring Methods
A number of torque-measuring methods exist, starting with the mechanic's "feel" and ending with installing strain gages on the bolt. The accuracy in determining the applied torque values is cost dependent. Tables VII and VIII are by two different "experts," and their numbers vary. However, they both show the same trends of cost versus torque accuracy.
| Preload measuring method | Accuracy, percent | Relative cost |
|---|---|---|
| Feel (operator's judgment) | ±35 | 1 |
| Torque wrench | ±25 | 1.5 |
| Turn of the nut | ±15 | 3 |
| Load-indicating washers | ±10 | 7 |
| Fastener elongation | ±3 to 5 | 15 |
| Strain gages | ±1 | 20 |
| Type of tool | Element controlled | Typical accuracy range, percent of full scale |
|---|---|---|
| Slug wrench | Turn | 1 Flat |
| Bar torque wrench | Torque | ±3 to 15 |
| Turn | 1/4 Flat | |
| Impact wrench | Torque | ±10 to 30 |
| Turn | ±10 to 20° | |
| Hydraulic wrench | Torque | ±3 to ±10 |
| Turn | ±5 to 10° | |
| Gearhead air-powered wrench | Torque | ±10 to ±20 |
| Turn | ±5 to 10° | |
| Mechanical multiplier | Torque | ±5 to 20 |
| Turn | ±2 to 10° | |
| Worm-gear torque wrench | Torque | ±0.25 to 5 |
| Turn | ±1 to 5° | |
| Digital torque wrench | Torque | ±1/4 to 1 |
| Turn | 1/4 Flat | |
| Ultrasonically controlled wrench | Bolt elongation | ±1 to 10 |
| Hydraulic tensioner | Initial bolt stretch | ±1 to 5 |
| Computer-controlled tensioning | Simultaneous torque and turn | ±0.5 to 2 |
| Element controlled | Preload accuracy, percent | To maximize accuracy |
|---|---|---|
| Torque | ±15 to ±30 | Control bolt, nut, and washer hardness, dimensions, and finish. Have consistent lubricant conditions, quantities, application, and types. |
| Turn | ±15 to ±30 | Use consistent snug torque. Control part geometry and finish. Use new sockets and fresh lubes. |
| Torque and turn | ±10 to ±25 | Plot torque vs turn and compare to previously derived set of curves. Control bolt hardness, finish, and geometry. |
| Torque past yield | ±3 to ±l0 | Use "soft" bolts and tighten well past yield point. Use consistent snugging torque. Control bolt hardness and dimensons. |
| Bolt stretch | ±1 to ±8 | Use bolts with flat, parallel ends. Leave transducer engaged during tightening operation. Mount transducer on bolt centerline. |
References
- Fastener Standards. 5th ed., Industrial Fasteners Institute, Cleveland, OH, 1970.
- Baumeister, et al.: Mark's Standard Handbook for Mechanical Engineers. 8th ed., McGraw-Hill, 1978.
- Seely, F.B.: Resistance of Materials. 3rd ed., Wiley & Sons, 1947.
- Shigley, J.E.; and Mitchell, L.D.: Mechanical Engineering Design. 4th ed., McGraw-Hill, 1983.
- Machine Design, Nov. 19, 1981.


